

That's how I look at it because, for some reason, Baked Alaska is one of those things I've always wanted to make! I'm really not sure why - maybe it's just the presence of ice cream that I always want to eat but there's something special about a Baked Alaska, an element of surprise. When I first got my little kitchen blow torch last Christmas, I knew I'd eventually make my way to this dessert. It feels good to finally have a go at it!
I made these as our "back to school" cake(s) this year. Celebrating the first day back to school is a great reason to make and eat cake! I am very lucky - and grateful - that my husband was home to help me photograph these torched mounds of ice cream cake! With hands sticky with meringue and thoughts of melting ice cream, it was a luxury to have a helper snap some pics for me. He is such a good sport to go along with this hobby of mine. I pay him back with dessert, and he seems happy with this arrangement.
 A Baked Alaska is basically an ice cream cake encased in a snowy, billowy mound of torched meringue. It's fascinating to look at, fun to cut into, and delicious to eat! It takes a few steps to make but you can do it ahead and try to keep it as simple as possible. I'm giving my ice cream maker a well-deserved break and used store-bought ice cream.
I started by making a chocolate cake base, scaling down this recipe from Martha. I really love the idea of neapolitan flavors in a Baked Alaska but instead of trying to make layers in my small Alaskas, I went with mint chocolate chip ice cream and just one base layer of cake at the bottom (you could alternate layers of cake and ice cream if you want). This chocolate cake recipe is perfect for ice cream cake - so moist and since it's made with oil, it doesn't harden like a rock in the freezer.
 I used small glass prep bowls to make my mini Baked Alaskas and you could use anything from teacups to bowls or a cake mold. Or make one large Baked Alaska instead. Just spray the bowl with cooking spray and line it with plastic wrap, leaving plenty of overhang. Then pack in a good-quality, creamy, dense ice cream before sealing it with the cake layer that will become the bottom. It's easy to take the chocolate sponge cake you've baked and cut out the size you need by inverting the cup or bowl you're using for the mold and cutting out the rounds you need. This can (and should be) assembled ahead and kept in the freezer until show time - when you make the meringue, apply it liberally onto the frozen, molded cakes, and torch it!
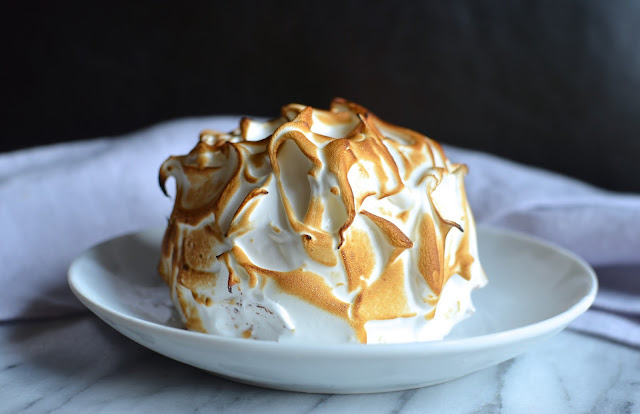
 I coated the cakes with a thick layer (insulation, really...) of Swiss meringue before giving it a quick, thorough pass with the kitchen blow torch. You can actually bake the cakes in a very hot oven but I think the blow torch is very quick and effective here. In an instant, you achieve beautiful-to-look-at as well as delicious peaks of toasted meringue.
 I'm happy I finally got to make my Baked Alaska. It's most definitely a very special treat.
I was trying to wrap my head around making these Baked Alaskas for a while, trying to figure out how to scale down the recipe and not have too much waste. Since I didn't follow a precise recipe, there had to be some cake leftovers and a little extra meringue. I decided not to sweat it and just go ahead and make these little dessert wonders.
 To start with, the key thing for me was making the cake base. Martha's recipe turned out great. Folding beaten egg whites into the batter makes for a very light, spongy cake. And using oil (instead of butter) in the cake allows the cake to remain relatively soft even after freezing so the cakes are easy to cut into and eat.
 I cut the recipe down by half and instead of baking it in a baking sheet, I baked it in a 9x13 rectangular pan. Since I wasn't going to alternate layers of cake and ice cream as per the original recipe, I wanted a thicker layer of cake for my base. (I actually removed a bit of the batter - maybe about 3/4 cup - and baked it in a single cake mold because I thought I had a bit too much and didn't want the cake layer to be too thick. That just complicates things and you don't need to do that...baking the entire batter in the 9x13 pan should be just fine.)
 As you can see, I used different size bowls to make my Baked Alaskas. You can essentially use whatever bowl/cup you have. After packing in the ice cream and setting the cake base on top, I wrap the cakes up with the plastic overhang, placed them on a small baking sheet, and stowed them away in the freezer. This should be done at least the day before.
And if you find yourself with a good amount of extra cake left, you could always cut it up (wrap it and freeze it for another date) and use it to make a trifle.
 When it's time to make the dessert, unmold the ice cream cakes. I found it very helpful to set the bowls in warm water for a few seconds. Then, they pop right out. Set the unwrapped cakes on a baking sheet and return them to the freezer to firm up while making the meringue. You want the ice cream cakes as solid and cold as possible.
 The swiss meringue worked beautifully and held up very well! I had thick, glossy, sticky, marshmallow-like meringue to apply on to the ice cream cakes. I put on a thick layer and used a spoon and offset spatula to make swirls and swoops.
 Torching them was a lot of fun. It happens so fast and the meringue just smells so toasty and delicious. I finished these on the afternoon of the first day of school. I, very carefully, let my son help me torch one of these.
 And there we have it...a few mini Baked Alaskas!
 The sweet, toasty meringue with ice cream and chocolate cake is quite an irresistible combination! I'm amazed by this dessert and the wizard who first dreamed it up.
Recipe:
Mini Baked Alaskas
Adapted (and scaled down) from Martha Stewart
- For three mini Baked Alaskas, using 4-5 inch round glass prep bowls (you can use other size cups or bowls as the mold to make more or less) -
For chocolate cake:
1 cup sugar, divided
2/3 cup all-purpose flour
1/2 cup unsweetened Dutch-processed cocoa powder
1 teaspoon baking powder
1 teaspoon baking soda
1/2 teaspoon salt
1/2 cup vegetable or canola oil
1 teaspoon vanilla extract
1/3 cup warm (at about 100 degrees) water
3 large eggs, separated, and at room temperature
Ice cream: Approximately 1 quart of mint chocolate chip ice cream (or flavor of your preference; just use a good-quality, dense ice cream that doesn't melt easily)
For meringue:
4 large egg whites, at room temperature
1 scant cup sugar
Pinch of cream of tartar
Preheat oven to 350 degrees. Spray a 9x13 inch cake pan with cooking spray and line it with parchment paper.
Sift 2/3 cup of the sugar, as well as the flour, cocoa powder, baking powder, baking soda, and salt into a bowl. In a measuring cup, combine the oil, water, and vanilla.
Place egg yolks in the bowl of a stand mixer fitted with the whisk attachment. Whip on medium-high speed until pale and thick, about 4-5 minutes. With machine running, slowly add the oil mixture, then add the dry ingredients, mixing until combined.
In a clean mixing bowl (and clean whisk attachment), whisk egg whites on medium-high speed, gradually adding the remaining 1/3 cup of sugar, until medium-peaks form. Mix one third of the whites into the cake batter, then gently fold in the rest.
Scrape batter into the prepared cake pan, smoothing out the top with an offset spatula. Bake until cake is set and springs back lightly to the touch, about 15 minutes. Let cool on a cooling rack before inverting onto a cutting board and removing the parchment paper.
To assemble the Baked Alaskas, cut out 3 cake rounds using the bottom of the bowl you are using as the mold (you need it to fit the bowl you're using snugly to become the base of the ice cream cakes). Coat the 3 glass prep bowls with cooking spray. Line each with plastic wrap, leaving plenty of overhang.
Fill each bowl with ice cream, leaving enough space to fit the cake rounds. Top each with a cut out cake round and press down lightly. Cover the assembled cakes with the plastic overhang. Freeze at least 4 hours or overnight (you can do this days ahead).
Unmold the cakes by opening up plastic wrap, flipping the cakes out onto a baking sheet and removing the plastic wrap (if necessary, place the bowls in warm water for a few seconds and the cakes should release easily). Place cakes back in the freezer while making the meringue to allow it to firm up and be as cold and solid as possible.
To make the swiss meringue, heat egg whites, sugar, and cream of tartar in a heatproof bowl over a pot of simmering water. Whisk often until sugar dissolves and the mixture is warm to the touch and turns white in color, about 2-3 minutes. Transfer bowl to the mixer and whisk until stiff, glossy peaks form.
Remove cakes from the freezer. Apply a generous coating of meringue to each, using a spoon or small offset spatula to create swoops and swirls. At this point, you can set the cakes in the freezer for a few hours, if necessary. When ready to serve, use a small kitchen blow-torch and very carefully brown the meringue. (Alternatively, you could set it in a 500 degree oven for 2-3 minutes until meringue is browned.)

I started by making a chocolate cake base, scaling down this recipe from Martha. I really love the idea of neapolitan flavors in a Baked Alaska but instead of trying to make layers in my small Alaskas, I went with mint chocolate chip ice cream and just one base layer of cake at the bottom (you could alternate layers of cake and ice cream if you want). This chocolate cake recipe is perfect for ice cream cake - so moist and since it's made with oil, it doesn't harden like a rock in the freezer.


I was trying to wrap my head around making these Baked Alaskas for a while, trying to figure out how to scale down the recipe and not have too much waste. Since I didn't follow a precise recipe, there had to be some cake leftovers and a little extra meringue. I decided not to sweat it and just go ahead and make these little dessert wonders.


And if you find yourself with a good amount of extra cake left, you could always cut it up (wrap it and freeze it for another date) and use it to make a trifle.


Recipe:
Mini Baked Alaskas
Adapted (and scaled down) from Martha Stewart
- For three mini Baked Alaskas, using 4-5 inch round glass prep bowls (you can use other size cups or bowls as the mold to make more or less) -
For chocolate cake:
1 cup sugar, divided
2/3 cup all-purpose flour
1/2 cup unsweetened Dutch-processed cocoa powder
1 teaspoon baking powder
1 teaspoon baking soda
1/2 teaspoon salt
1/2 cup vegetable or canola oil
1 teaspoon vanilla extract
1/3 cup warm (at about 100 degrees) water
3 large eggs, separated, and at room temperature
Ice cream: Approximately 1 quart of mint chocolate chip ice cream (or flavor of your preference; just use a good-quality, dense ice cream that doesn't melt easily)
For meringue:
4 large egg whites, at room temperature
1 scant cup sugar
Pinch of cream of tartar
Preheat oven to 350 degrees. Spray a 9x13 inch cake pan with cooking spray and line it with parchment paper.
Sift 2/3 cup of the sugar, as well as the flour, cocoa powder, baking powder, baking soda, and salt into a bowl. In a measuring cup, combine the oil, water, and vanilla.
Place egg yolks in the bowl of a stand mixer fitted with the whisk attachment. Whip on medium-high speed until pale and thick, about 4-5 minutes. With machine running, slowly add the oil mixture, then add the dry ingredients, mixing until combined.
In a clean mixing bowl (and clean whisk attachment), whisk egg whites on medium-high speed, gradually adding the remaining 1/3 cup of sugar, until medium-peaks form. Mix one third of the whites into the cake batter, then gently fold in the rest.
Scrape batter into the prepared cake pan, smoothing out the top with an offset spatula. Bake until cake is set and springs back lightly to the touch, about 15 minutes. Let cool on a cooling rack before inverting onto a cutting board and removing the parchment paper.
To assemble the Baked Alaskas, cut out 3 cake rounds using the bottom of the bowl you are using as the mold (you need it to fit the bowl you're using snugly to become the base of the ice cream cakes). Coat the 3 glass prep bowls with cooking spray. Line each with plastic wrap, leaving plenty of overhang.
Fill each bowl with ice cream, leaving enough space to fit the cake rounds. Top each with a cut out cake round and press down lightly. Cover the assembled cakes with the plastic overhang. Freeze at least 4 hours or overnight (you can do this days ahead).
Unmold the cakes by opening up plastic wrap, flipping the cakes out onto a baking sheet and removing the plastic wrap (if necessary, place the bowls in warm water for a few seconds and the cakes should release easily). Place cakes back in the freezer while making the meringue to allow it to firm up and be as cold and solid as possible.
To make the swiss meringue, heat egg whites, sugar, and cream of tartar in a heatproof bowl over a pot of simmering water. Whisk often until sugar dissolves and the mixture is warm to the touch and turns white in color, about 2-3 minutes. Transfer bowl to the mixer and whisk until stiff, glossy peaks form.
Remove cakes from the freezer. Apply a generous coating of meringue to each, using a spoon or small offset spatula to create swoops and swirls. At this point, you can set the cakes in the freezer for a few hours, if necessary. When ready to serve, use a small kitchen blow-torch and very carefully brown the meringue. (Alternatively, you could set it in a 500 degree oven for 2-3 minutes until meringue is browned.)