
Happy New Year! My goodness - it's really 2014 already! While it may take me a while to remember to write '14 from now on, I'm ready to throw confetti onto the New Year and hope it's the start of a happy and healthy one that's filled with causes for celebration for us all.
For my first post of 2014, I thought I'd go with bread - that most basic, nourishing, nurturing food that most of us would find hard to live without.
I love bread in general, and you might recall my love of english muffins (I straight-up just love carbs), but multigrain bread is one of my very favorite types. I adore the flavor from the grains and seeds embedded inside. The nuttiness and texture you get from a loaf of good multigrain bread is so addicting and satisfying. I love it so much that I tend to talk a lot about places, restaurants, where I can get a good slice or roll of it. Here's an example...my husband and I used to go to a little restaurant in New York City called King's Carriage House. It's a cozy place and their food - as in the actual dishes - was terrific (whether for lunch, brunch, tea, or dinner) but what I always think about is a great multigrain roll they served there. Am I a little odd for putting so much emphasis on the bread?
.JPG)
.JPG)
.JPG)


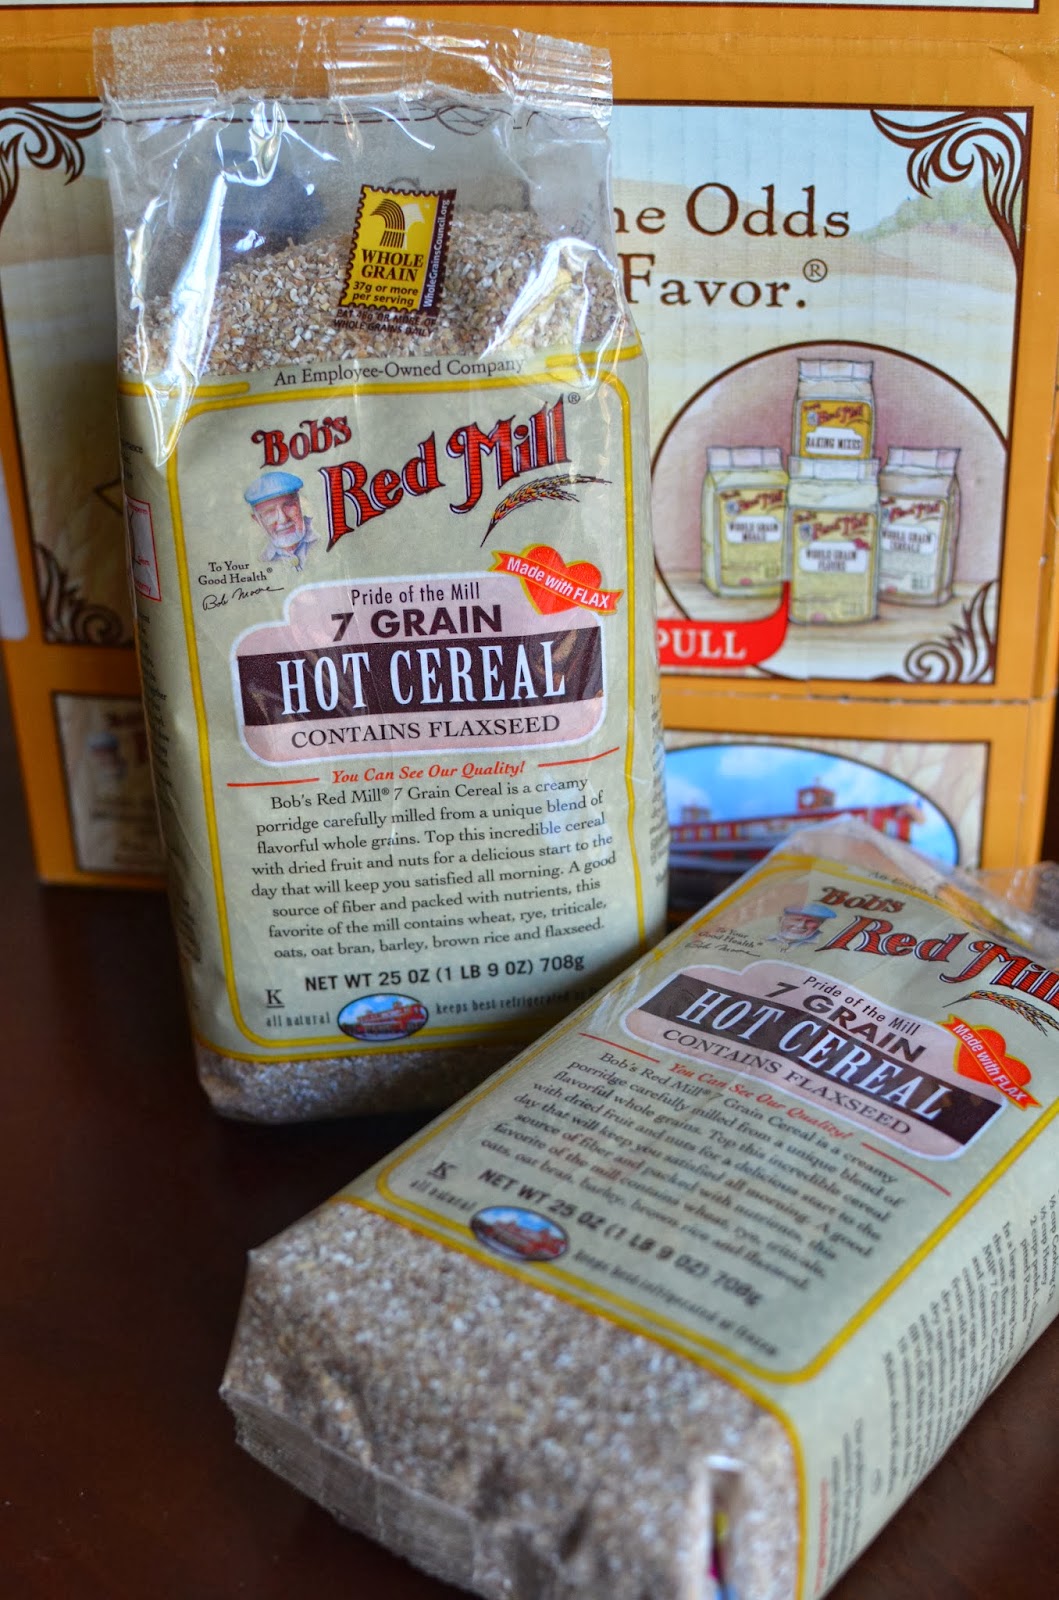
This is the 7-grain hot cereal used for this multigrain bread. I'm a big fan of Bob's Red Mill. As I mentioned earlier, I could only find 9-grain at the supermarket and while I'm pretty certain that would've worked just fine, I really didn't want any unpleasant surprises so I ordered a 4-pack via amazon. And I bought the 4-pack because it didn't cost much more than ordering just one! It makes a very tasty hot cereal and it's become a quick alternative to my favorite, steel cut oatmeal.
 To summarize the process, you start by taking a cup of 7-grain cereal and stirring it together with 2 cups of boiling water. Let it sit for about half an hour, stirring occasionally, until it thickens and cools to about 110 degrees.
.JPG) This porridge, the multigrain cereal, is a big bulk of this delicious bread. The rest consists of about 2 1/2 cups all-purpose flour, 1 cup whole wheat flour (I used white whole wheat flour), instant yeast, a bit of butter and honey, as well as half a cup of pumpkin seeds (you could also use sunflower seeds).
This porridge, the multigrain cereal, is a big bulk of this delicious bread. The rest consists of about 2 1/2 cups all-purpose flour, 1 cup whole wheat flour (I used white whole wheat flour), instant yeast, a bit of butter and honey, as well as half a cup of pumpkin seeds (you could also use sunflower seeds).
.JPG) It takes about 1 to 1 1/2 hours for the dough to rise, doubling in size.
It takes about 1 to 1 1/2 hours for the dough to rise, doubling in size.
.JPG) My dough certainly had no problems rising that day! I probably should have checked on it more frequently and moved on to the next step a tad earlier.
My dough certainly had no problems rising that day! I probably should have checked on it more frequently and moved on to the next step a tad earlier.
To get ready for the pan, shape the dough into a 9-inch square, roll it up, pinching the seams. I quickly realized that the 1 lb., 8 1/2 x 4 1/2 inch pan, I thought would be just fine was too small! I quickly switched to one of my older, roomier loaf pans (it should be 9 x 5 inch, matching the recipe instructions, but I think it's a tad larger) - crisis averted!
.JPG) Once placed into the loaf pan, you're suppose to let it rise again to roughly double in size, about 45 to 75 minutes. Did I mention my dough was quite substantial already?! I couldn't help but think my dough was very close to being ready for the oven. So instead of going by the time parameter, I looked to what America's Test Kitchen says about the actual signs that the dough is ready for the oven...
Once placed into the loaf pan, you're suppose to let it rise again to roughly double in size, about 45 to 75 minutes. Did I mention my dough was quite substantial already?! I couldn't help but think my dough was very close to being ready for the oven. So instead of going by the time parameter, I looked to what America's Test Kitchen says about the actual signs that the dough is ready for the oven...
The bread is ready, or sufficiently proofed, when you lightly press it with a moistened finger or your knuckle and it feels springy. The indentation you made should slowly fill back in. If it doesn't fill in, the dough has risen for too long (uh-oh!). If it fills back very quickly, it needs more time to rise. Over-risen dough will turn out a dense, short loaf. Under-risen dough will make for a dense loaf that may tear on top. I went with this test and by all indications my dough was ready so in the end, it only sat in the loaf pan for about 15 minutes.
Before going in the oven, brush the top with melted butter and sprinkle about 1/4 cup of old-fashioned rolled oats on top. This really gives it a professional look. It's finished with a light spray of water on top before baking.
.JPG) Bake the bread in a 350 degree oven (make sure you have it preheated early and ready when the bread is!). In 40-50 minutes, you should have a tall loaf of multigrain bread that has an internal temperature of 200 degrees.
Bake the bread in a 350 degree oven (make sure you have it preheated early and ready when the bread is!). In 40-50 minutes, you should have a tall loaf of multigrain bread that has an internal temperature of 200 degrees.
.JPG) I am so glad I put the bread in the oven when I did. It turned out tall and sturdy. The interior is soft and light with an even crumb.
I am so glad I put the bread in the oven when I did. It turned out tall and sturdy. The interior is soft and light with an even crumb.
.JPG) Looking at it cooling on my kitchen counter, you can see it really is a big, tall loaf! I was surprised by that.
Looking at it cooling on my kitchen counter, you can see it really is a big, tall loaf! I was surprised by that.
.JPG) I love the look of the oats on the surface of this bread. But in the interest of full disclosure, I'd like to tell you that a lot of the oats fell off on slicing in my case.
I love the look of the oats on the surface of this bread. But in the interest of full disclosure, I'd like to tell you that a lot of the oats fell off on slicing in my case.
But honestly, this was one of my favorite accomplishments in baking. Such deliciousness and so much to learn...kind of like life itself.
Recipe:
For my first post of 2014, I thought I'd go with bread - that most basic, nourishing, nurturing food that most of us would find hard to live without.
.JPG) |
| Multigrain bread made with 7-grain hot cereal and pumpkin seeds |
.JPG)
So for me, good multigrain bread just makes me smile and brightens up my day a little. It's the little things in life! And when it's good, I feel it hardly needs anything more than a light toasting because the bread itself is so full of flavor all on its own. I love to savor it and appreciate all its nuances.
.JPG)
That said...a little salted butter or some jam (as my husband likes to have it) - not to mention ham and eggs on the side for breakfast - never hurts either. But honestly, I think it's really delicious all by itself.
.JPG)
So given my passion for it, you can imagine I wanted to try this recipe from America's Test Kitchen when I first saw it. It was bookmarked for a long time, I made a couple of other bread recipes first to get a little experience under my belt, and now I've done it. And I'm so happy to report that this bread - this monster of a loaf - turned out completely delicious! It certainly hits the mark in flavor and texture. It has nuttiness and chewiness in spades.
The "secret" or shortcut to attaining the multigrains in the bread is hot 7-grain cereal. Why is it when you want to buy 7-grain cereal at the supermarket, all you can find is 9-grain! Not wanting to mess up the recipe in any way, I ordered a four-pack case of 7-grain cereal via amazon. And I'm glad I did. Not only have I been enjoying bowls of the stuff for breakfast occasionally, this bread is worth searching out the cereal for.

I felt such a sense of accomplishment taking this bread out of my oven and onto our table. If I can do it, you can bet it was fairly simple. I have very little experience in bread-making, having only worked with yeast a handful of times and in the last few months only. What I've learned is that it's a fluid, live process - one you have to flow with and adjust around. It's honestly exciting and a bit scary at the same time. Just when I'm feeling confident everything is going according to plan (or the recipe), I'm thrown a curve ball. In this case, the bread was rising faster - and more - than I expected. I had to switch the bread pan I intended to use to accommodate the size of the loaf! And what a big, lofty, fluffy (not tough or overly dense) loaf it turned out to be! It worked. It really worked.

Bread-making is clearly a skill honed with time and practice, and while I'll never be any expert, it is definitely rewarding. The other week (before this experiment), I found myself out of bread and with bad weather making it inconvenient to go out and buy some. So I made my own! That is a very cool feeling, to make your own bread and provide your family with a basic that is at the same time very special. I feel empowered as I'd never envisioned being able to make multigrain bread myself, at home, by following a recipe. Thank you, America's Test Kitchen!
Aside from trying to make good eats to share and linger over with my family at the table, this whole thing of puttering in the kitchen, playing with flour, and what have you, is also about learning and discovery in an area I'm passionate about - food! I hope to learn more and make a few more discoveries this year...
.JPG)
.JPG)
.JPG)
To get ready for the pan, shape the dough into a 9-inch square, roll it up, pinching the seams. I quickly realized that the 1 lb., 8 1/2 x 4 1/2 inch pan, I thought would be just fine was too small! I quickly switched to one of my older, roomier loaf pans (it should be 9 x 5 inch, matching the recipe instructions, but I think it's a tad larger) - crisis averted!
.JPG)
The bread is ready, or sufficiently proofed, when you lightly press it with a moistened finger or your knuckle and it feels springy. The indentation you made should slowly fill back in. If it doesn't fill in, the dough has risen for too long (uh-oh!). If it fills back very quickly, it needs more time to rise. Over-risen dough will turn out a dense, short loaf. Under-risen dough will make for a dense loaf that may tear on top. I went with this test and by all indications my dough was ready so in the end, it only sat in the loaf pan for about 15 minutes.
Before going in the oven, brush the top with melted butter and sprinkle about 1/4 cup of old-fashioned rolled oats on top. This really gives it a professional look. It's finished with a light spray of water on top before baking.
.JPG)
.JPG)
.JPG)
.JPG)
But honestly, this was one of my favorite accomplishments in baking. Such deliciousness and so much to learn...kind of like life itself.
Recipe:
Multigrain Bread
From America's Test Kitchen's Best Baking Recipes
- Makes one, tall, 9 inch loaf -
2 cups boiling water
1 cup (5-ounces) 7-grain hot cereal
3 tablespoons unsalted butter, melted and cooled, plus more for brushing
3 tablespoons honey
2 1/2 to 3 cups (12 1/2 to 15 ounces) all-purpose flour
1 cup (5 1/2 ounces) whole wheat flour (I used white whole wheat)
2 1/4 teaspoons instant or rapid-rise yeast
1 1/2 teaspoons salt
1/2 cup unsalted pumpkin seeds or sunflower seeds (I used pumpkin)
1/4 cup old-fashioned rolled oats or quick oats
In a medium heat-proof bowl, stir the boiling water together with the 7-grain cereal. Let sit, stirring occasionally, until mixture thickens and cools to about 110 degrees. This takes about 30 minutes. Stir in melted butter and honey.
In the bowl of a stand mixer fitted with the dough hook, mix together 2 1/2 cups of the all-purpose flour, the whole wheat flour, yeast, and salt. On low-speed, add the warm cereal mixture and mix until dough comes together, about 2 minutes.
Continue kneading the dough until it is smooth and elastic, about 8 minutes. About halfway through, check to see if more flour is needed. The goal is for the dough to clear the sides of the bowl but stick to the bottom. If more flour seems necessary, add the remaining 1/2 cup of all-purpose flour, one or two tablespoons at a time. During the final minute of mixing, add the pumpkin (or sunflower) seeds to combine.
Turn the dough out onto a lightly floured surface. Knead it by hand to form a round ball, then place the dough in a lightly greased bowl and cover it with a piece of greased plastic wrap. Let rise in a warm spot until doubled in size, about 1 to 1 1/2 hours.
Grease a 9 x 5 inch loaf pan with cooking spray. Turn the risen dough out onto a lightly floured surface and gently press it into a 9-inch square. Roll the dough up tight into a cylinder and pinch the seams close. Place the loaf, seam side down, into the pan. Lightly spray the top of the loaf with cooking spray, cover loosely with plastic, and let rise again in a warm spot until about doubled in size and the dough barely springs back when gently pressed, roughly 45 to 75 minutes*.
Have oven preheated at 350 degrees with a rack in the middle position. Before baking, brush the top of the loaf with some melted butter, sprinkle with the oats, and lightly spray the top with water. Bake until golden and the center registers 200 degrees, approximately 40 to 50 minutes, rotating the pan halfway through baking.
Let bread cool in the loaf pan for about 15 minutes before turning out and letting it cool fully on a wire rack for about 2 hours before serving.
* From my experience, I think it's best to test the readiness of the dough rather than only relying on the time measure. The bread is ready, or sufficiently proofed, when you lightly press it with a moistened finger or your knuckle and it feels springy. The indentation you made should slowly fill back in. If it doesn't fill in, the dough has risen for too long (which will make for a dense, short loaf). If it fills back very quickly, it needs more time to rise (under-risen dough will make for a dense loaf that may tear on top).